Monday, July 31, 2017

I'm Mad About You with Joy Clair Stamps

Greetings friends and fellow crafters. LeeAnn here with a post for Joy Clair using an oldie but goodie. We were asked to choose one of our favorite stamp sets to work with. In doing so I sat and looked through my boxes and chose the "Love Quotes" set. The original plan is not the project I made, but I may go back and make it as well at a later date. SO, lets get going with my project.


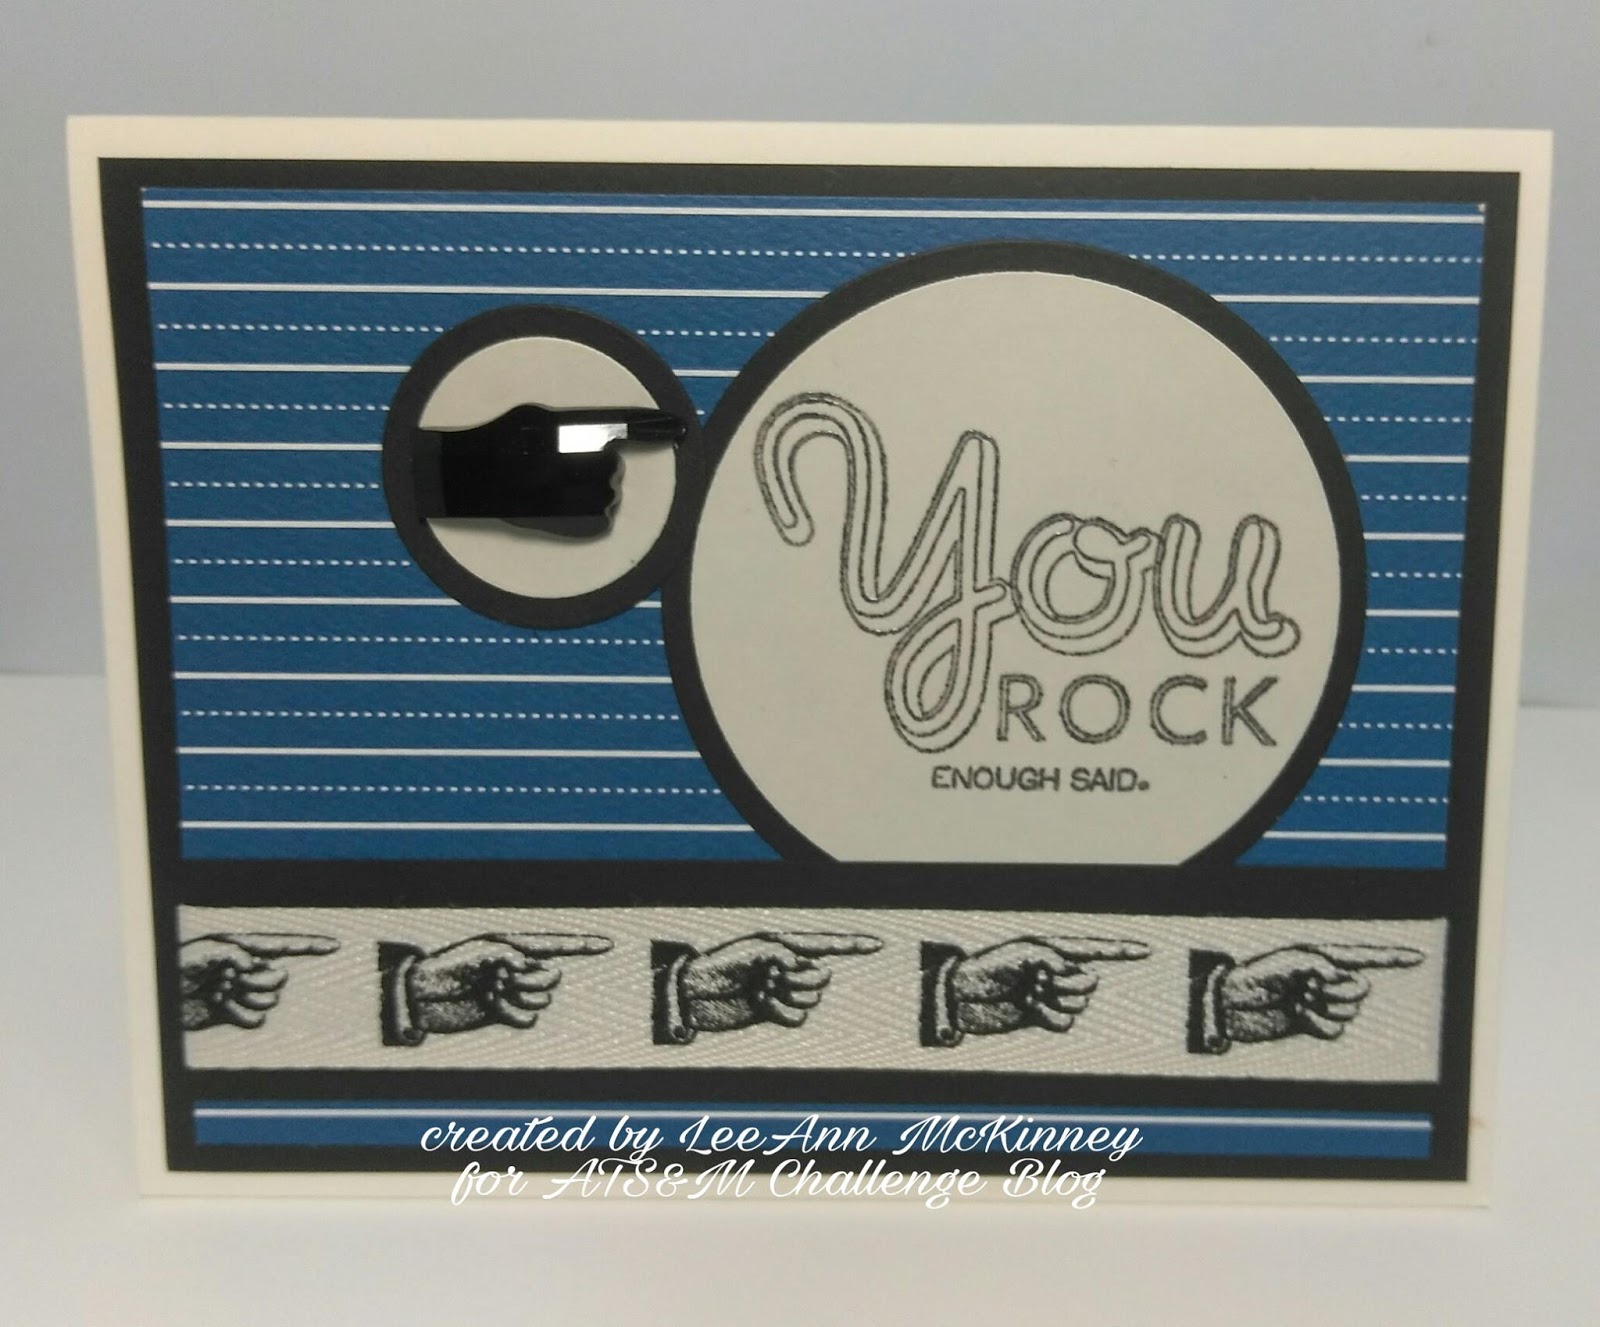
The background paper is from a Recollections Valentine's Pack from either 2016 or 2017. The die cut layers and base are Recollections 110 lb card stock and the sentiment is stamped with Memento Tuxedo Black Dew Drops on Recollections 110 lb card stock.

To make this card I used  an A2 Base and cut the pattern layer at 5.25" x 4". I affixed this layer with double side tape.

I used my Big Shot to cut the dome layers and again used double side tape to adhere together and to the base.

The sentiment I stamped and cut with my Scan N Cut, then adhered it with foam dots.

And with that last step my project was complete.

I hope you enjoyed my project today, please follow my blog and receive notification when my next post goes live.

Please follow Joy Clair's facebook pageColor by Faith Bible Journaling facebook pageInstagram and Twitter, be the first to hear the news, sales and giveaways! They also have a Pinterest page and Youtube channel for your inspiration!
Thank you for stopping by and please come back again soon!

Friday, July 21, 2017

Christmas In July Tag with Joy Clair Stamps


Greetings friends and fellow crafters, LeeAnn here today with a Christmas in July tag I made using Joy Clair stamps. For this project I used the "Three Wise Men" stamp set. 

To make my project I used Recollections 110 lb weight card stock as my base. I stamped the wise men with Versamark ink, sprinkled with Gold embossing powder and heat set it, I did the same with the stars and used yellow embossing powder for them. 


While in stamping mode, I stamped the sentiment on a second piece of card stock. 

Once that was complete I used my Zig Clean Color Real Brush Markers to color the robes of the wise men. 

I followed that up with using my distress inks in Seedless Preserves, Tumbled Glass and Hickory Smoke and blended them for the sky, and a bit lighter towards the bottom of the tag and left it lighter to act like a halo around the men. 

Once this was done I used my Gina Marie Stitched Tag Dies to cut the project to the size desired. I used my Perfect Punch to add a hole in the desired spot, and then add a gold star brad so the tag would turn to reveal the sentiment. 

This project will go in my Christmas Box with the cards I have made in the past six months in preparation for this years holiday season. 

I hope you have enjoyed my project today, and that it gives you inspiration in getting your Christmas projects started early. 


Please follow Joy Clair's facebook pageColor by Faith Bible Journaling facebook pageInstagram and Twitter, be the first to hear the news, sales and giveaways! They also have a Pinterest page and Youtube channel for your inspiration!
Thank you for stopping by and please come back again soon!

Wednesday, July 19, 2017

Chocolate Lovers Greetings

Chocolate Lovers Post

Greetings friends and fellow crafters. I had the pleasure of getting a bunch of Sunsational stamps clear stamps in the mail last weekend, and have been having fun with them. This set is called Addicted to Chocolate and comes with three awesome bears and the sentiment. What is great is each bear has its favorite chocolate. Using some fun background paper, I went to work.


Addicted To Chocolate


This background paper is from a Die Cuts With A View paper pack, this little bear loves her chocolate bards. Colored with Spectrum Noirs. 
This is background paper is from a Doodlebug 6x6 pack. Also colored with Spectrum Noirs and he loves his cocoa. 


This background paper is also from a Doodlebug 6x6 pack. Colored with Spectrum Noirs and loving kisses. 

I hope you have enjoyed this project.

If you haven't checked out this months challenge yet, the theme is Christmas in July, the link is here, looking for your projects.

Tuesday, July 18, 2017

Quick Quotes Christmas in July fun

Greetings friends and fellow crafters, LeeAnn here today with a Christmas in July project using Quick Quotes Paper and a few other fun items from my stash.  
To make this project I used a mixture of papers including Serenade (our new paper), Winter Bliss and Windsong.
To start this project I chose the paper I wanted to use. My base is from our new paper Serenade 4.25" x 5.5", I then cut another piece of the same paper at 4" x 5.25" so I could use the green flipside as my background. 
For the base that my sentiment is stamped on, and the stamped piece for the little girl I used Windsong paper, The sentiment piece is supposed to simulate carpet for the girl (colored with colored pencils) and tree to stand on. 
The tree is a die from my friend Kat, and I used Winterbliss to to cut the tree and flip flopped the pieces to get varied looks for each layer, and added a few metallic stars to finish it off. 

Please be sure to stop by and take part in this months Challenge 77 where the theme is Red, White and Blue. 

Thanks for stopping by, please come back again soon. 


Quick Quotes Products used:
Serenade SR101 coming soon

other products used...
My Favorite Things overflowing joy stamp/die set
Kat Scrappiness Christmas Tree Die
Colored Pencils


YOU ROCK ATS&M Challenge 251 Anything Goes

Greetings friends and fellow crafters, today I am bringing you a project made for the Challenge 251 at Addicted to Stamps & More. 


Items Used:
Recollections 110 lb cardstock as the beige base, black panel, beige and black circles as well as the black bar under the ribbon. The blue cardstock is from my scrap stash
The ribbon and gemstone are from the stash given to me back in 2015 by a lady downsizing her belongings. 
The stamp is from Studio G, and was stamped using Memento London Fog.

Hope you have enjoyed this project and it has given you some inspiration for your challenge project. 

Friday, July 7, 2017

Quick Quotes Red, White and You

Greetings friends and fellow crafters, LeeAnn here today, it is the first Friday of the month and that means it is time to reveal the July Challenge. This month our theme is... Red White and Blue!

Be sure to stop back at the blog this weekend for the Challenge Winner Announcement for Friday Challenge 76 - "Masculine Cards or Projects".

I created a 6x6 4th of July project to sit on the mantel for years to come. 

Using Paper from several of the Quick Quotes sets I put this project together, and hope you enjoy it. 

Using Serenade QQP-SR103 I cut a 6x6 panel to cover my canvas.
Using Serenade QQP-SR102, Anchors Aweigh QQP-AW100, Adventure Awaits QQP-AD101, and a Pine Needle Die I ran each panel through my Big Shot and turned the cut upside down to simulate fireworks. 

I used my Canon Selphy to print a photo from our fireworks my husband set off this year. This machine is the easiest printer I have ever use. I just open the Canon Print app on my phone, choose the image I want to print and hit print. It goes to the printer and does its thing. 

I used Buttercup and Sunset Powderpuff inks to blend a sunset at the bottom of the 6x6 panel. I then used a small piece of the opposite side and stamped out Happy 4th of July using Royal Blue and Red Lipstick Powderpuff inks. I blended the Buttercup and Sunset along with Warm Grey over the top so that it would blend in with the background. This I cut with an oval die, and used foam dots to pop it up. 

I used double sided tape to adhere the fireworks, and the photo paper is actually a sticker.

I then found this flag banner that is leftover from a project my daughter did in middle school (11 years ago) and added it along the top. 

I really hope you enjoyed this project. I had a great time making it and again plan on setting it out each year.


Quick Quotes Products Used...

Serenade QQP-SR103- coming soon
Serenade QQP-SR102- coming soon 
Anchors Aweigh QQP-AW100
Adventure Awaits QQP-AD101
PowderPuff Inks:

Other items used:
Joy Clair 4th of July Stamp Set
Gina Marie Pine Needles Die
Sizzix Oval Die
Flag Banner from Stash

Wednesday, July 5, 2017

Deco Foil and Stencils Oh My

Greetings friends and fellow crafters, LeeAnn here with a project I made for GinaMarie. This is my first time using Deco Gel and Foil and made a video showing the process. 


First tape down the stencil then stir the gel and spread nicely over your stencil. Remove the stencil and wash. Set the page aside to dry, Once your page is fully dry, add a sheet of DecoFoil over the page, place it in a piece of copy paper and run it through your warmed up laminator. When it comes out remove the foil and your card is ready to finish.

The base of the card is Recollections 110 lb cardstock in Gray.
The stamps are Altenew Build a Rose three step stamps that were included in a papercrafting magazine in 2016. I stamped these on Recollections 110 lb cardstock using Memento Dew Drops first layer Dandelion, second Layer Cantaloupe and third layer Tangelo. The outer edges are brushed with New Sprout. The Smile stamp came with the flower set as did the die. I stamped the word Smile using Memento Tuxedo Black. 

I hope you have enjoyed this project as much as I have enjoyed sharing it with you. Thank you and have a crafty day. 

Items used:
Gina Marie Designs Triburst Stencil


Tuesday, July 4, 2017

Happy Fourth of July with ATSM and LeeAnn

Hi There friends, here is my #249 CAS inspiration for Addicted to Stamps & More!!!


Using Joy Clair stamps, Kat Scrappiness Sequins and Memento Dew Drops, this project came together pretty quick and I had fun making it. The cardstock is all Recollections 110 lb weight, and an A2 card. 

Sunday, July 2, 2017

Christmas In July with Sunsational Stamps

Greetings friends and fellow crafters. LeeAnn here with my project inspiration for our July 2017 monthly Challenge using the Christmas in July theme. 

For this project I used Jingles and her pup, along with my spectrum noir markers. 
Jingles
While the image was printing, I used my Big Shot to cut the fireplace segment of my card. All of the paper used on this project is from Recollections. 

I used my Scan n Cut to cut Jingles and her pup out, and then colored using my Spectrum Noirs, the colors will be listed below. 

Skin- FS2, FS3
Eyes- LG2
Hair- GB1, TN1
Dress- DR2, DR3, LG5
Boots- GB9, TN4, GB1
Bells- IG4
Dog- IG3, IG9, True Black 

Please come join our Challenge I can't wait to see all your projects. 

Saturday, July 1, 2017

Where is your LIFE???

Greetings friends and fellow crafters. LeeAnn here with another two projects using vinyl from StyleTechCraft and Tape Technologies. I was browsing a group on FaceBook and there was a guy that was promoting his SVG files, really nice guy, and his files were free when you share his post via Twitter, FB or Google+. I have 2 files today that I was able to have fun with. 

Made using Gold #127


Made using Rose Gold, a new color

I really love working with vinyl and this Ultra Metallic vinyl from Tape Technologies is amazingly easy to work with. It cuts like butter with my Silhouette Cameo, and in three years it is the first vinyl I have been able to get accurate cuts matching the blade settings preset in the machine. Blade setting of 1, and I will also say, the blade is my original vinyl blade that I have had for 3 years. I have always used one blade for vinyl and another for paper, whether that has anything to do with it or not I am not sure. 

Color Chart for The Ultra Metallic Colors:

Ultra Metallic Colors
My husband is really happy with the new designs on the truck, Camping Life will be coming next for him. 

I hope you have enjoyed these projects. 


How To Make Vinyl Gift Canvas Easy

Greetings friends and fellow crafters. LeeAnn here today with my first project as a member of the Tape Technologies team . Please Follow Tape Technologies, Inc on Facebook here

Our great nephew was two on June 30 and he is a for sure Disney Baby. We live less than an hour from Disney World and he lives 3, but he has been more times in the past two years than we have in the last 4. And he LOVES it each and every time. So, with that in mind when it came time to make my project I went with a Disney theme. 

Using Tape Technologies Ultra Metallic Vinyl I chose numbers Black 128 and Red 129 as my product to use. 
Colors available as of 6/30/2017 This is a 2 mil film with silver metallic flake giving you a great glittery sparkle. Each color is designed for both indoor and outdoor use. 

I used an 11" x 14" white canvas and spray painted it yellow with Krylon Short Cuts Hobby/Craft Paint Soft Yellow, and let it dry overnight. 

I then went to work on the computer. I used free fonts from DaFont.com to create the lettering for my project. The Fonts used were Waltograph, Walter, Budmo and Mickey and Minnie. Once these were downloaded I unzipped the files and started up the Silhouette Cameo Software. While doing this the fonts automatically loaded into the program and were available to use. 


I set the page settings as 11"x14" so that I would be able to make a complete layout of my project. 

I then typed out the statements I wanted line by line and after that was complete I changed the font colors to Black or Red to reflect the vinyl color I would be using. The next step was to set each in the font type desired. 


Once I had the layout ready, the fun part started. I first moved all the Red lines off the work space and consolidated the Black to the top half of the page, I set the vinyl on my cutting mat vinyl side up and sent it to cut. 

TIP: make a thin line between your cutting areas to make weeding the vinyl an easier job, especially with so many fonts. 

Once I had my projects excess vinyl weeded off, I was able to use Respositional Contact Paper as a transfer sheet. I used a credit card as a squeegee to get a clean pick up. 


Once I had all the black lines complete I did the same with the Red. I then started arranging them in the order they belong on the canvas. 
A few letters stuck to the vinyl when I was weeding my lines and I had to make a re cut to replace them.

Then using that same credit card squeegee I went to work smoothing the vinyl on the canvas. 
I then was double checking myself as something didn't look right, and sure enough I had mis-spelled Mouska, it is supposed to be Mooska, so I cut another o and fixed it. 

And within a short time after fixing my errors my project was complete. 

I hope you have enjoyed this project I have made. 

Toadily Awesome with Joy Clair


Greetings friends and fellow crafters. LeeAnn here with a project for the Joy Clair July Challenge theme of Anything Goes using your favorite Joy Clair stamp set. 
I chose Hoppy Birthday!!!
I had this project in mind for a while, sat down and made it and just knew it would be used for this post.


The base is a Recollections A2 size base with gold foil trim. I then cut a 4.25" x 5.25" panel from Recollections 110 lb white cardstock and sprayed with Fireworks "Summer Sky" from Imagine crafts. to achieve the blue background. 

Once I had that base dry I used a square die and cut out a section that was offset from the center. I then sprayed it a little more to make it a little darker to resemble water and let it dry. 

I stamped the frog on Recollections 110 lb white using Memento Cottage Ivy and let it dry. I then cut it out with my Scan n Cut. 

On the square I had cut I used my Kaleidacolor "fresh greens" ink pad to stamp the lily-pads using the "Ink Splatter" stamp set. 

I cut a square of mesh larger than the square and used double stick tape to attach it to the inside of the top panel, and to attach the "lily-pad" square to the base. 

I attached the top panel to the base using foam dots and then added the frog. 

For the sentiment I used Stazon Hydrangea Blue to stamp it, then cut the rectangle with a die, and used a Fantastix stick to pick up color from the Kaliedacolor pad to ink the edges.

And with that my project was complete. I hope you have enjoyed it, and I look forward to seeing all the great projects entered into this months Challenge


By entering you will have a chance to win a $25 Gift Certificate to the Joy Clair Store. One lucky winner will be announced on 
July 31st!!!
Good Luck!