Showing posts with label #cleanandsimple. Show all posts

Saturday, April 13, 2019

Hello Spring, So glad you have joined us

Greetings friends and fellow crafters. LeeAnn here with 2 cards I made using the Echo Park "Spring Showers" stamp set and some items from my stash.


 For this first card I stamped out my images, cut them and colored using Alcohol Markers. I decided then to use the Lawn Fawn Shadowbox Die set and create a fun card. I used GinaK Amalgam Ink to stamp my images as I knew I would be using the alcohol markers, and ScraPerfect "Best Glue Ever" to adhere my images within the card.
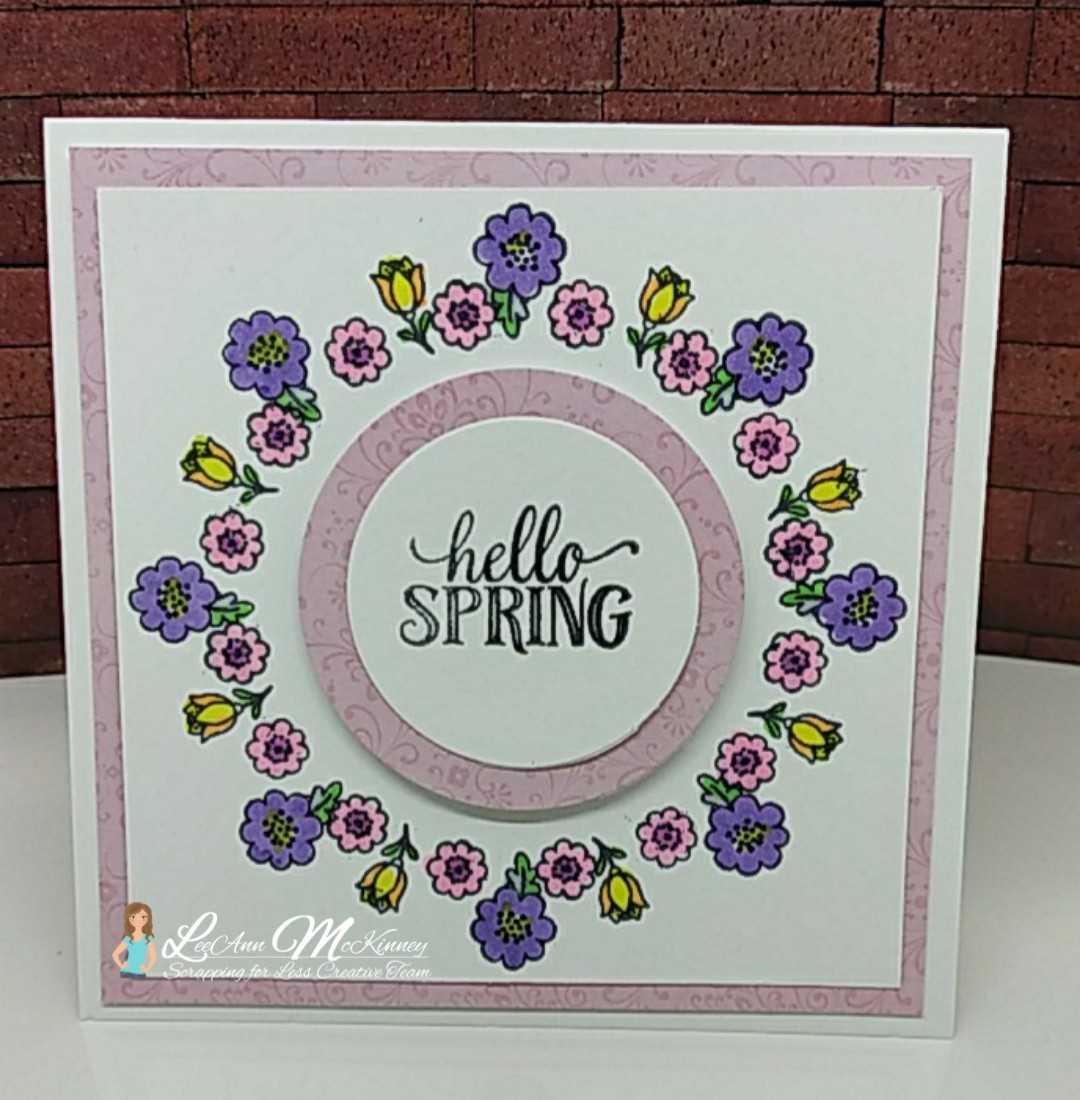
This card was so easy to making using the GinaK Designs Wreath Builder. I used the small images from the Spring Showers stamp set and repeatedly stamped using the wreath builder and my Tim Holtz stamp platform. I colored the images using my alcohol markers, cut 2 circles using  a set of dies from my stash and stamped the Hello Spring sentiment using GinaK Amalgam ink. I used foam to pop up the sentiment panel, ScraPerfect glue to adhere my layers together and with that my second project was complete.

Please follow along with  Scrapping For Less on All Social Media Outlets.

Sunday, April 7, 2019

Your Own Kind of Beautiful with GinaK and Scrapping For Less


Greetings friends and fellow crafters, Spring has arrived and I am excited to share two Spring Time cards I made today using GinaK Designs "Your Own Kind of Beautiful" stamp set I really love this stamp set and could not just stop with one card.


With this first card I stamped out the cacti and cut with my Brother Scan N Cut. I then used a banner die to cut a shelf. I used Distress Oxide in Cracked Pistaccio and a blender brush to make a background.Using Artist Loft Markers I colored up the images and after using stitched rectangle dies and ScraPerfect glue to put my layers together, I used foam tape to pop up the shelf and this card was complete. 


I decided I needed a little more fun with this set, and this bicycle reminded me of one I had in high school. Using paper from a 6x6 paper pad for my background and a Spellbinders window die,  to make this scene work. I colored the image with Artist Loft markers and adhered my layers using ScraPerfect glue. The bicycle is adhered using foam tape for pop.

Please follow along with  Scrapping For Less on All Social Media Outlets.


Sunday, January 20, 2019

SFL January 2019 Flavor of the Month Sneak Peek

Greetings friends and fellow crafters. LeeAnn here and oh boy am I excited to bring this sneak peek to you today.
This months kit is going to be so fun, and I think everyone of you out there in crafty land will enjoy it. Can you guess the theme???
Be sure to follow the Scrapping For Less Blog this week for all the sneak peeks that are coming your way. As for mine, I used paper from one of the collections, and a cut apart from the same collection to make this adorable card. So quick and easy anyone can make it. 

Be sure to come back Midnight Friday night for the Flavor of the Month Kit Release Blog Hop. Get yours ordered now before they sell out. 

Please follow along with  Scrapping For Less on All Social Media Outlets.


Thursday, October 25, 2018

October 2018 FOTM Sneak Peek

Greetings friends and fellow crafters. LeeAnn here with a sneak peek for the October 2018 Scrapping For Less Flavor of the Month Card Kit. This is an awesome kit packed with all our favorite things. I can't wait until Saturday to show you all of them, but for now I will share this card I made.

 if this cute little santa peeking out doesn't entice you, well... come on... he is too cute. Come on over to the shop and sign up for your kit NOW. This one will sell out fast. The team has been doing sneaks all week, and our hop starts at 12:01 AM on Saturday 10/27. Be sure to check it out and hop along so you can see all the awesome stuff the team has made for you.


Wednesday, October 10, 2018

Lawn Fawn Lunchbox Notes with White Rose Crafts

Greetings friends and fellow crafters. LeeAnn here with my weekly post with White Rose Crafts.
Image may contain: text
This week we are spotlighting Lawn Fawn Products, and let me tell you I am so excited, I love the little critters. For my post this week I used 4 of the small sets and had so much fun doing so.
Believe In Yourself stamp set and Gingerbread Man Sparkle Blends

Winter Alpaca Stamp Set and Frozen Sparkle Blends

Winter Fox Stamp Set and Bubblegum Ice Sparkle Blends

Winter Sparrows Stamp Set and 2017 Christmas Freebie Sparkle Blends. While this set is no longer available the Bough's of Holly Sparkle Blends is an awesome replacement.

All of my images were stamped with Memento Tuxedo Black Dye Ink and colored with Chameleon Markers.
My layers are adhered using Kaisercraft double sided tape.
All stamping was done using my Tim Holtz Stamp Platform.
Be sure to use Coupon Code Lawn Fawn at checkout to receive 10% off all Lawn Fawn Products in stock at the Lawn Fawn Tab in the store.
I hope you have enjoyed this projects today. Please see the great products available at the White Rose Crafts online store.


Monday, April 16, 2018

Hello, Sunset Giraffe with Creative Vision Stamps

Greetings friends and fellow crafters. LeeAnn here with my first post with the Creative Vision Stamps design team. 
 Using the Giraffe from the Animals Foilables set and Pretty Penny Foil, I put this project together. The steps to make this project are as follows:
1. Turn on my laminator (Scotch) and let it heat up while I moved ahead to my background. 
2. Using Distress Oxide Inks in Fossilized Amber, Spiced Marmalade and Picked Raspberry I blended my sunset background on Bristol Smooth Paper. 
3. I used a circle die to cut the sunset out and affixed it to my black background piece with double side tape.
4. By this time my laminator was nice and hot and I folded a piece of copy paper in half, put in the Toner Sheet from Foilables 58 and a 4" section of the Pretty Penny foil.

5. When the page came through my laminator I turned over and sent it through again upside down. 
6. Once it came through, I allowed a few minutes to cool and peeled back the foil and it was beautiful. 
7. I then put the Giraffe page in the same copy paper and the negative of the same foil Pretty Penny sheet so I could have the pretty swirls.

8. I ran this through my laminator twice as well, so that the pretty swirls were now attached to the giraffe like spots. 

9. I then cut out the giraffe using my Scan n Cut.
10. I used foam adhesive and clear dots to attach the giraffe to my background piece, and after diecutting Hello out of Coral paper, I attached using my Xyron X. 
11. Final step on this project was to add 3 yellow matte enamel dots in the upper left corner. 

Recap of items used in this project:
Animals Foilables

Pretty Penny Foil
I hope you have enjoyed this project today. Please be sure to take a look over at Creative Vision Stamps and see all the other amazing Foilable products available, as well as the stamps in Clear and Red Rubber.

If you like what I created today, you can shop www.creativevisionstamps.com and use my Design Team discount code to receive 10% off your next order of $20 or more. Enter my code: LEEANN10 at checkout. (It is valid on regular priced items only, doesn't count toward shipping and taxes, and cannot be used with their custom stamp service.)


Sunday, January 14, 2018

Sending Hedgehugs from White Rose Crafts

Greetings friends and fellow crafters, LeeAnn here today with a clean and fairly simple card using the Sending Hedgehugs stamp set from Lawn Fawn. This and many other fun sets can be purchased at White Rose Crafts.
In order to make this card I first used a stitched circle die to cut out my red circle. I used double side Adhesive Sheets to adhere the circle to my light pink panel. I then cut the panel to 4"x5.25" and using a Darice Embossing Folder and my Big Shot I dry embossed that panel to use as my topper. 
From there I stamped the Hedgehogs using Memento Tuxedo Black ink, and colored using Desert Sand and Rich Chocolate Memento Markers. I then used the matching Dies to cut out the images.
Using a Spellbinders rectangle die I cut a panel using white cardstock and stamped the "Sending Hedgehugs" sentiment using the same Memento Tuxedo Black ink.
All paper in this project is Recollections, the white is 110 lb, pink/red is 65 lb.

I hope you have enjoyed this project today. Please see the great products available at the White Rose Crafts online store.


Wednesday, January 3, 2018

Love You Tons with White Rose Crafts

Greetings friends and fellow crafters. LeeAnn here with my first post of 2018 and my first post as a first quarter guest designer with White Rose Crafts.
White Rose Crafts is an online store in Virginia, USA that carries a great variety of product, including some favorites from UK.
So, for my first project I decided to dig into my stash of stamps and find some I have had for a while but never used. It's a great thing to have product the company sells when you join their team as you can get started while waiting for your design team package.
ANYWAY... for todays project I used Lawn Fawn's Love You Tons stamp set.

Using Recollections 110 lb red card stock as the base topped with a layer of 110lb white, and a 65 lb sheet from a 6x6 Recollections paper pack called "Be Mine Valentine".
I stamped the Elephants with Memento Tuxedo Black and used the dies to cut them with my Big Shot. I then colored using my Memento marker in London Fog. I doubled up on the lines to add shading.
I cut a 1" x 4" piece of 110 lb white card stock, stamped the sentiment in Ladybug Red a well as the hearts at the beginning and end of sentiment and above the elephants trunks. The row of hearts under the sentiment is a strip from the paper pack.

I hope you liked today's project. I will be back again soon, with another project from White Rose Crafts.